
A commercial flat roof can feel like an “out of sight, out of mind” asset—until a ceiling stain appears, tenants complain about a musty odor, or a heavy Southern storm exposes a small issue that has quietly grown for months. For property managers, flat roof maintenance isn’t just about preventing leaks; it’s about protecting tenant operations, controlling long-term capital expenses, meeting insurance expectations, and extending the service life of one of the building’s most expensive systems. The good news: most costly flat-roof failures are preventable with a consistent plan, smart documentation, and quick response to early warning signs.
This guide breaks down practical, field-tested maintenance tips for commercial flat roofs, with examples and actionable steps you can implement across single buildings or multi-site portfolios. While every roof is unique, the principles remain the same: keep water moving, keep details sealed, keep the membrane protected, and keep records that support budgeting and warranty compliance.
1) Know Your Flat Roof System and Its Weak Points
Before you can maintain a flat roof effectively, you need to know what you have. “Flat” roofs are rarely perfectly flat; they’re low-slope systems designed to shed water through drains, scuppers, and gutters. The membrane type, attachment method, insulation configuration, and edge details all influence how the roof ages and how it should be serviced.
Common commercial low-slope systems include TPO and PVC single-ply membranes, EPDM rubber, modified bitumen, and built-up roofing (BUR). Each has different seams, flashing details, and vulnerability patterns. For example, TPO relies heavily on heat-welded seams; EPDM depends on adhesives and tape; modified bitumen often shows wear first at laps and transitions. A property manager doesn’t need to be a roofer, but knowing the system helps you ask the right questions and spot issues early.
Also consider what’s beneath the membrane. Insulation type (polyiso, EPS, etc.), vapor barriers, and deck material (metal, concrete, wood) affect moisture behavior and repair complexity. A leak in a metal-deck building may travel along flutes and show up far from the entry point. In humid Southeastern climates, trapped moisture can create insulation saturation and reduce energy performance long before you see a drip.
Identify the “high-risk zones” on every roof
Most leaks start at details, not in open field membrane. High-risk zones include penetrations (HVAC curbs, plumbing vents, electrical conduits), perimeter edges, expansion joints, skylights, parapet walls, and transitions where the roof meets a different material. These areas flex, heat-cycle, and take the brunt of wind uplift and thermal movement.
Drainage points are another critical zone. Internal drains, scuppers, overflow drains, and gutters are where debris accumulates and where ponding water often begins. If you manage multiple properties, you’ll notice patterns: retail roofs with nearby trees clog more often; restaurant roofs see grease-laden exhaust that can degrade certain membranes; warehouses with frequent rooftop traffic develop punctures near access points and equipment.
Action step: Build a simple roof profile for each building—membrane type, install year, warranty term, known leak history, and a map of penetrations and drains. Even a one-page summary helps new team members, vendors, and ownership understand priorities quickly.
2) Build a Preventive Maintenance Schedule (and Stick to It)
Preventive maintenance is the difference between predictable operating costs and emergency invoices. A strong schedule reduces leak calls, extends membrane life, and supports warranty compliance. For most commercial flat roofs in the Southeast, plan on at least two formal inspections per year—typically spring and fall—plus event-driven checks after major storms.
Seasonality matters. Spring inspections catch damage from winter temperature swings and identify drainage issues before heavy rain season. Fall inspections prepare the roof for leaf drop and ensure drains and scuppers are clear before storm systems and colder nights increase condensation risk. If your property has heavy HVAC use, frequent rooftop access, or known ponding problems, quarterly inspections may be justified.
Maintenance scheduling should include more than inspections. Include routine drain cleaning, debris removal, sealant touch-ups (where allowed by the system), and a clear process for documenting repairs. The goal is consistency: small issues addressed early are far cheaper than saturated insulation, mold remediation, or tenant downtime.
Recommended inspection cadence for property managers
Use a tiered approach based on building use and risk:
- Standard risk: Office buildings and small commercial sites with limited rooftop traffic—inspect twice per year plus after major storms.
- Higher risk: Retail centers, restaurants, and buildings with many penetrations—inspect quarterly plus after storms.
- Critical operations: Medical, data/telecom, manufacturing—consider monthly walk-throughs by onsite staff (visual only) and quarterly professional inspections.
Real example: A multi-tenant retail property with five rooftop units per bay often experiences seam stress and flashing wear around curbs. Moving from semiannual to quarterly inspections can catch early cracking at corner flashings before water enters and travels into tenant spaces. That single adjustment can prevent repeated “mystery leaks” that damage tenant relationships.
Create a repeatable checklist your team can follow
A checklist prevents missed items and makes inspections comparable over time. Include: membrane condition, seam integrity, flashing condition, drain/scupper status, signs of ponding, condition of walk pads, rooftop unit curbs, pitch pans, pipe boots, termination bars, counterflashing, parapet coping, and any signs of unauthorized penetrations.
Action step: Keep two versions of your checklist. One is a quick visual checklist for onsite staff (10–15 minutes). The second is a detailed version for your roofing contractor with photos and measurements. This creates a “two-layer” safety net: staff can spot obvious problems quickly, while professionals handle technical evaluation and repairs.
3) Manage Water: Drainage, Ponding, and Moisture Control
Water is the number-one enemy of commercial flat roofs. Even membranes that are designed to be watertight can fail when water sits in place, carrying debris, accelerating UV degradation, stressing seams, and finding its way into small imperfections. In the Southeast, intense rain events can overwhelm partially clogged drains quickly, turning minor debris into a major interior incident.
Property managers should treat drainage as a core operational task, not a “roofing issue.” Drains, scuppers, gutters, and downspouts are part of a single system. If the roof drains well but downspouts are clogged, water backs up. If gutters overflow, fascia and exterior walls can suffer, and water can re-enter at roof edges.
Moisture control also includes managing interior humidity and condensation. In some buildings, what looks like a roof leak may be condensation from HVAC issues, poorly insulated ductwork, or inadequate vapor control. A good maintenance program considers the building as a system and uses evidence—location patterns, weather conditions, and moisture readings—to diagnose correctly.
How to spot and address ponding water
Ponding water is typically defined as water that remains 48 hours after rainfall (assuming normal drying conditions). Signs include “dirt rings,” algae growth, and discoloration where water sits. Ponding can be caused by deflected decking, compressed insulation, clogged drains, or poor original slope design.
Actionable options depend on cause and warranty constraints. Simple fixes include clearing drains, adding tapered insulation saddles near drains, or installing additional drains/overflows where code allows. In some cases, adding walkway pads and reinforcing traffic paths reduces localized compression that contributes to low spots.
Real example: A warehouse roof with frequent service traffic to rooftop units developed low spots near the access path. Adding walk pads and redirecting traffic, combined with targeted insulation improvements during a scheduled repair, reduced ponding and extended the roof’s usable life—without a full replacement.
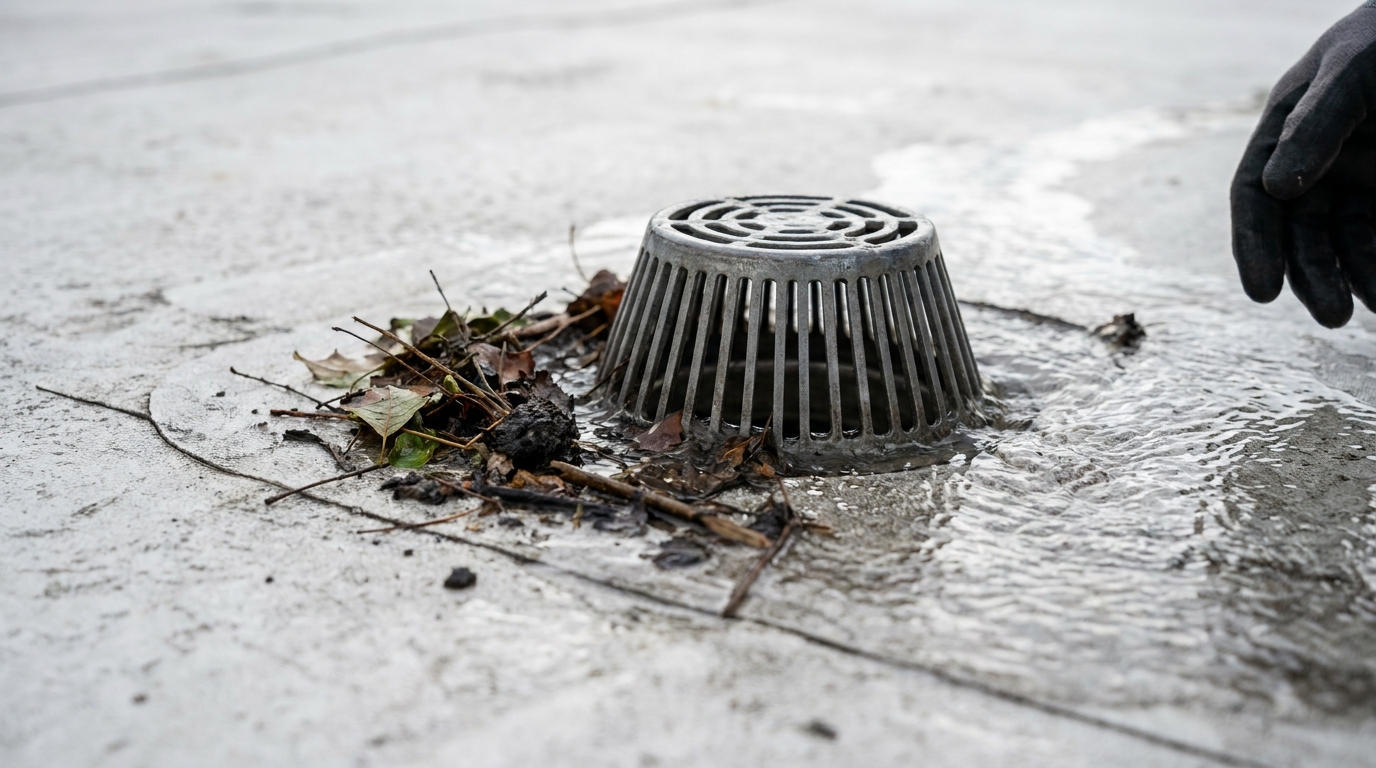
Keep drains and scuppers clear—without damaging the roof
Drain maintenance should be routine. Remove leaves, branches, trash, and gravel (if present) carefully. Avoid metal shovels or sharp tools that can puncture membranes. Use soft brooms and plastic scoops, and don’t drag debris across the surface.
Check strainers and clamping rings, and ensure drain bowls are free of sediment. For scuppers, verify that exterior discharge areas are not blocked and that water can flow away from the building. Confirm that overflow drains or scuppers exist and are functional—these are critical during extreme rainfall and may be required by code.
Action step: After cleaning, pour a small amount of water near drains to confirm flow. If water backs up, you may have a downline blockage that requires plumbing support. Document the issue immediately; repeated backups can justify budget for improvements.
4) Protect the Membrane: Traffic Control, Repairs, and Rooftop Etiquette
Many commercial flat roof problems come from people—not weather. HVAC technicians, electricians, signage installers, and other trades often access roofs without understanding membrane sensitivity. A dropped screw, a dragged tool bag, or an unprotected ladder can create punctures that don’t leak immediately but fail later under wind-driven rain.
Property managers can reduce this risk with clear rooftop rules and physical protections. Establish designated access paths, require protective mats under ladders, and ensure walk pads are installed in high-traffic areas. If your building has frequent service calls, consider adding more permanent protection around units and along common routes.
Repairs also need to be compatible with your roof system and warranty. “Quick fixes” like generic caulk, roof cement, or incompatible sealants can void warranties and create harder-to-repair messes. The right repair method depends on membrane type and detail. For single-ply roofs, that often means properly welded patches and manufacturer-approved accessories.
Set a rooftop access policy that vendors must follow
A simple policy can prevent recurring damage. Require vendors to check in, use designated access points, avoid working during unsafe conditions, and report any accidental damage immediately. Include basic rules such as “no cutting on the roof,” “no open flames unless approved,” and “no storing materials on the membrane.”
Consider adding signage at roof hatches and access doors. When multiple vendors service a property, visible reminders reduce “I didn’t know” incidents. If your portfolio includes multi-tenant buildings, communicate policies to tenants as well—unauthorized satellite dish installs and signage penetrations are a common source of leaks.
Action step: Keep a small “roof protection kit” onsite (walk mats, plywood sheets, soft broom, trash bags) so maintenance staff can support safe access and quick cleanup.
Prioritize small repairs before they become big ones
Flat roofs often give early warning signs: lifted seam edges, cracked sealant at terminations, loose counterflashing, missing fasteners at edge metal, deteriorated pipe boots, and punctures near units. If you catch these early, repairs are usually localized and affordable.
Develop a triage approach:
- Immediate: Active leaks, open seams, punctures, storm damage, loose edge metal.
- Near-term: Aging flashings, minor seam wear, small areas of membrane abrasion.
- Monitor: Cosmetic wear, minor discoloration, areas with no moisture intrusion evidence.
Real example: A property with repeated leaks near a parapet discovered the true cause was loose coping metal allowing water behind the wall flashing. Securing the coping and reworking the termination detail solved what patching the membrane alone never could.
5) Storm Readiness and Post-Event Response in the Southeast
In Gainesville, the Atlanta Metro, and across the Southeast, commercial roofs face high winds, hail, heavy rain, and rapid temperature swings. Storm readiness is not just an emergency plan—it’s part of routine asset management. A roof that is well-maintained before a storm is far more likely to survive without major damage, and if damage does occur, documentation and quick action can reduce losses.
Pre-storm preparation includes confirming drains are clear, securing loose materials, checking edge metal and flashing, and ensuring rooftop equipment is properly anchored. After a storm, time matters. Water intrusion can escalate quickly, especially in buildings with acoustic ceiling tiles, insulation, or sensitive inventory.
Property managers should also understand how storm damage is evaluated for insurance and warranties. Hail impact, punctures, membrane bruising, and seam separation can be missed by untrained eyes. A professional inspection with photos, measurements, and moisture scanning can provide the evidence needed for claims and help prioritize repairs.
Pre-storm checklist for property managers
When severe weather is forecast, run through a short checklist:
- Clear drains, scuppers, and gutters; verify overflow paths.
- Remove rooftop debris and secure loose items (pavers, tools, signage materials).
- Inspect and tighten/secure edge metal where accessible and safe.
- Confirm rooftop access points are locked and protected from wind-driven rain.
- Communicate with tenants about reporting leaks immediately.
Action step: Keep emergency contact information and roof plan documents accessible (digital and printed). During a storm event, you don’t want to be searching for warranty details or contractor numbers.
Post-storm response: what to do in the first 24–72 hours
After the storm passes, prioritize safety first—avoid roof access if conditions are unsafe. Once safe, perform a visual check for obvious issues: displaced edge metal, punctures, debris impact, clogged drains, and standing water. Inside the building, look for ceiling stains, wet insulation smells, and water near exterior walls and penetrations.
If you find active leaks, implement temporary mitigation: move inventory, protect equipment, and use containment measures. Then schedule a professional inspection quickly. The goal is to stop water entry and document conditions before further weather changes the evidence.
Real example: After a hail event, a property manager noticed only minor scuffs on the membrane. A professional assessment revealed widespread hail bruising and compromised seams that would have failed later. Early documentation supported a timely claim and allowed replacement planning before leaks affected tenants.
6) Documentation, Warranties, Budgeting, and When to Replace
Maintenance isn’t complete until it’s documented. Clear records protect you in warranty situations, support insurance claims, and help ownership make informed capital decisions. For property managers, documentation also reduces vendor confusion and speeds up troubleshooting when staff changes occur.
Warranties often require specific maintenance steps and may limit who can perform repairs. Some manufacturer warranties require certified contractors, approved materials, and documented inspections. If a non-approved patch is applied, it can complicate future warranty coverage. Always confirm warranty status before authorizing work—especially for newer roofs.
Budgeting is where good maintenance pays off. With consistent inspections, you can forecast repairs, plan for coatings or restoration (where appropriate), and schedule replacement before failures become disruptive. The goal is to shift from reactive spending to planned investment.
What to document after every inspection or repair
Create a standard record for each visit:
- Date, weather conditions, and inspector name/company
- Roof areas inspected and access points used
- Photos (wide shots and close-ups) with location notes
- Findings categorized by severity (immediate/near-term/monitor)
- Repairs completed, materials used, and who performed them
- Recommendations and estimated timelines
Action step: Use a shared folder structure by property and year. Even a simple system (e.g., “Property A > Roof > 2026 > Spring Inspection”) makes retrieval easy during claims or budgeting cycles.
Repair vs. restore vs. replace: making the call
Knowing when to repair, restore, or replace is one of the most valuable skills a property manager can develop. Repairs make sense when issues are isolated and the roof is generally sound. Restoration (such as coatings or targeted system upgrades) can be appropriate when the membrane is aging but still stable, and when moisture in the insulation is limited. Replacement is often the best option when the roof has widespread saturation, recurring leaks across multiple areas, failing seams throughout, or has reached the end of its service life.
Practical indicators that replacement planning should start include: repeated leak calls despite repairs, increasing repair frequency year over year, persistent ponding due to structural deflection, or moisture readings indicating saturated insulation in multiple zones. If you’re spending significant money annually on patching, it may be time to shift those dollars toward a planned replacement that reduces risk and improves performance.
Real example: A commercial building with a 20-year-old modified bitumen roof had “whack-a-mole” leaks every heavy rain. Moisture scanning showed multiple saturated areas. Instead of continuing patches, ownership approved a planned replacement during a slower business season, minimizing tenant disruption and stabilizing costs.
How professional partners help property managers succeed
A reliable roofing partner can act as an extension of your team—providing consistent inspections, clear reporting, code-compliant repairs, and honest guidance on lifecycle planning. Look for contractors who communicate clearly, document thoroughly, and understand how to work around tenant operations.
For property managers overseeing multiple sites, standardized reporting is a major advantage. When every inspection report uses the same format and severity ratings, you can compare properties, prioritize spending, and explain recommendations to ownership in plain language.
Action step: Ask your contractor to provide a multi-year roof plan: immediate repairs, 12–24 month preventive items, and a replacement forecast. This turns roofing into a manageable asset strategy rather than an emergency category.
Conclusion: A Maintenance Mindset That Protects Your Property
Commercial flat roofs don’t fail all at once—they fail in small, preventable steps: a clogged drain that leads to ponding, a loosened termination that allows wind-driven rain, a puncture from rooftop traffic, or a storm event that exposes an aging detail. For property managers, the most effective approach is consistent, documented preventive maintenance that focuses on drainage, detail integrity, and fast response.
Key takeaways to put into action now:
- Know your roof system type, age, warranty status, and high-risk zones.
- Inspect at least twice per year (more for high-traffic or high-penetration roofs) and after major storms.
- Make drainage a routine operational task—clear drains, verify flow, and address ponding early.
- Control rooftop traffic with policies, walk pads, and vendor expectations.
- Document everything with photos and standardized reports to support warranties, claims, and budgeting.
- Use repair/restoration/replacement decisions based on evidence, not guesswork.
With a proactive plan and the right professional support, you can extend roof life, reduce emergency calls, and protect tenants and ownership from the high costs of water intrusion—especially in the demanding weather conditions common across the Southeast.